%20RGB.png)
Making Your Own Kiss-Cut Sticker Sheets
- Evergreen Goods Team

- Jun 11, 2025
- 3 min read
Updated: Aug 21, 2025

Making your own kiss-cut sticker sheets at home is a satisfying and cost-effective way to personalize planners, gifts, product packaging, and more. Whether you’re a small business owner or a crafty hobbyist, knowing how to design your layout properly can save you paper, prevent alignment issues, and yield professional-looking results.
At Evergreen Goods, we offer a wide variety of printable sticker papers and vinyl sheets—perfect for every type of project. From matte finish paper labels to waterproof glossy vinyl, you can find the right material for your applications.
What You Will Learn
In this post, we’ll dive into:
What kiss-cut stickers are
How to prepare your design
Layout spacing and bleed lines
Creating cut paths
Efficient sheet usage tips
Bonus: Common troubleshooting tips
What Are Kiss-Cut Stickers?
Kiss-cut stickers are partially cut stickers that peel away from the backing sheet, leaving the surrounding paper intact. This design allows multiple stickers to be printed on one sheet. It's ideal for sticker books, branded label sheets, or themed sets.
All Evergreen Goods sticker papers come in A4 size and offer excellent print compatibility. They also feature easy-peel backing, including our crack-back matte paper and durable transparent vinyl.
Step 1: Preparing Your Design
To begin, use design software like Adobe Illustrator, Canva, or free alternatives like Inkscape to lay out your designs.
Design Tips
Start with an A4 template to match the size of our sticker paper or vinyl.
Maintain a resolution of 300 DPI for sharp prints.
If printing on glossy or vinyl sticker paper from Evergreen Goods, do a test print. This will help you check ink compatibility and drying times.
Step 2: Layout Spacing & Bleed Lines
To ensure stickers aren't cut too close to the artwork, you need to add spacing and bleed to your designs.
Important Guidelines
Bleed: Add at least 1.5mm around each sticker design to allow flexibility for the cutter.
Padding: Leave 2-3mm between each sticker so that cuts don’t overlap. This makes stickers easy to peel.
Margins: Keep at least 5mm space from the edge of the sheet to prevent printer cut-off issues.
All of our sticker sheets are designed to print with consistent edge margins. This is especially important for our photo-quality glossy paper and matte sticker paper, which feed smoothly through both inkjet and laser printers.
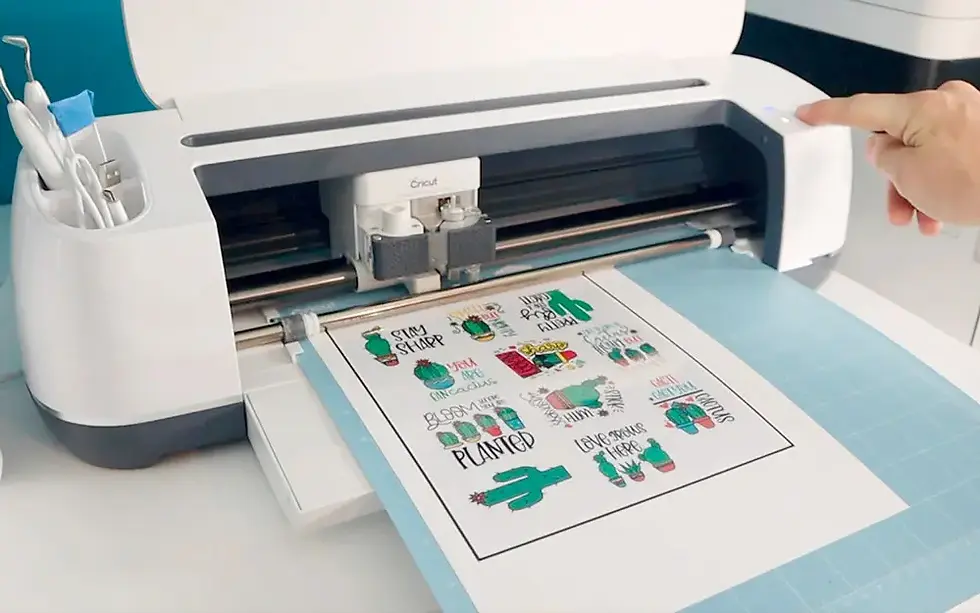
Step 3: Creating Cut Paths
Most cutting machines, such as Cricut, Silhouette, Brother, and Siser, require a dedicated cut path layer.
Key Tips
Duplicate your sticker artwork layer to create a cut line.
Use a solid stroke in a different color (often red or magenta) for your cut line.
Ensure that all cut lines are closed paths without any broken edges.
Evergreen Goods' paper and vinyl sheets are compatible with most plotter-style machines. Your kiss cuts will glide through cleanly without tearing.
Step 4: Efficient Sheet Usage
Don’t let space go to waste! Here are several tips to optimize your sheet:
Optimization Strategies
Mix Sizes: Combine larger and smaller stickers to fill gaps effectively.
Rotate Smartly: Angling stickers, especially circular ones, can save space.
Group Themes: Create seasonal, business, or color-coordinated sets for variety on a single page.
Use Guides: Set up a grid or alignment lines for quick standardization of your layout.
Pair these tips with our Pre-Cut Label Sheets from Evergreen Goods to save even more time—no measuring or trimming needed!
Bonus: Common Troubleshooting Tips
Even the best plans can hit snags. Here are solutions for common issues:
Sticker Sheet Not Aligned After Cutting? Print registration marks and use the print-then-cut function.
Paper Curling or Lifting? Try a lower blade setting or secure the sheet with masking tape.
Ink Smudging? Allow time to dry or use a fixative spray on inkjet prints. Evergreen Goods' paper is designed for fast-drying, smear-resistant printing.
Stickers Not Sticking Well? Ensure your surface is clean and dry. Use Evergreen Goods vinyl for smooth, lasting adhesion on most surfaces.
Cut Lines Not Going All the Way Through? Increase cut pressure or switch to a deeper blade.
Labels Peeling Off in Humid Conditions? Try our waterproof vinyl sheets with stronger adhesives tailored for food packaging, jars, and outdoor use.
Inconsistent Cuts? Regularly calibrate your machine and maintain a clean, sticky cutting mat.
Final Thoughts
Kiss-cut sticker sheets offer creative freedom combined with a polished look. With the right design setup, layout planning, and high-quality materials from Evergreen Goods, your homemade sticker sheets can rival store-bought options. Whether for business branding, seasonal decor, or creative fun, these tips will help you maximize every sheet.
Explore our full range of matte, glossy, transparent, and waterproof sticker papers today at www.evergreengoods.com.
Happy sticking!

Comments